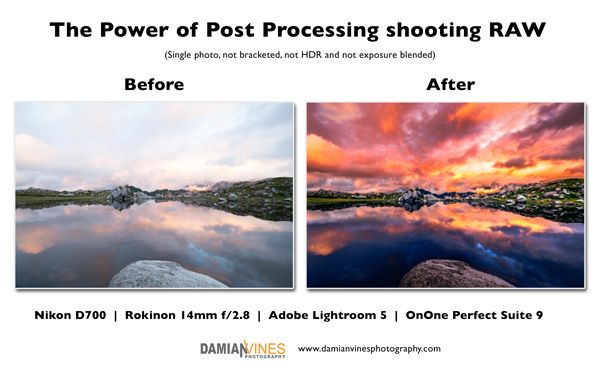
This before and after image shows the power of processing RAW files in Lightroom 5. The landscape image on the left, taken at Mount Baker an hour from Bellingham on Huntoon Trail at sunset, is the unedited “RAW” out of camera image that Lightroom processed upon import, the same image on the right is the edited image using Lightroom and further enhanced in OnOne’s Perfect Suite 9 program. Most of what you see here is done in Lightroom, except for the enhanced color, saturation and some clarity and sharpening techniques that were done in Perfect Effects.
The ability to alter, edit, or arguably “enhance”, a RAW files is astounding. For those not familiar with RAW… Many DSLR’s and other higher end cameras give you the ability to shoot in either jpeg mode, RAW mode or RAW+jpeg. Very briefly, a RAW file or “photo” isn’t really a photo at all, it’s just a bunch of code, data that was captured by your cameras sensor and stuffed into a proprietary file type. On Nikon it’s an .NEF file, on Canon it’s a .CR2 file. Before they are “decoded” or processed by a piece of software RAW files are just a bunch of bits. The RAW processing software has to interpret the data in order for you to see it as an image. The interesting thing is that the amount of data that is captured by your camera’s sensor is more than what is initially displayed in the image when you first open it in Lightroom.
Without going into too much detail… for instance, the right out of camera image may show a really bright area in the sky, washed out and not much detail. As long as your exposure wasn’t so extreme that you “blew out” that highlight area, Lightroom might be able to recover some of the detail and exposure information in that area. That’s because even thought Lightroom is showing you one interpretation of your image, your camera sensor actually capture more information. And by using the Highlights slider in Lightroom you might well be able to pull out details and information in those highlight areas that you didn’t even see existed. Likewise goes with the shadow and dark areas, they can be increased as well. Of course there is a limit to this and how far you can go. And in the case of the highlights especially, if you’ve completely overexposed and blown out highlights you’ll never recover them. You can gauge this by looking at your histogram and or using what are called “the blinkies” on your LDC screen to warn you when something in the image is blowing out. Other sensor data such as white balance, sharpness, contrast, etc. can also be altered by a large margin.
This isn’t as much the case however if you’re shooting in jpeg mode on your camera. The difference is that your camera is capturing all that massive data from the sensor but instead of saving it all and passing it along to you, it is converting all of that data and turning it into a .jpeg. It’s taking the exposure, contrast, sharpening, color balance, dynamic range, making a predetermined decision about what it thinks the best settings for each of those settings are and “baking it in” and compressing it into a .jpeg and throwing away all the other data that the sensor captured. This throw away data is the data that Lightroom could have used to re-interpret the image into what “you” might have preferred, or to give you the ability to recover those bright highlights and dark shadows, increasing the dynamic range of your photo. Does it mean that you can’t edit a .jpeg? No not at all, you can, you just have a massively hindered ability to adjust certain things to the fullest extent of what the camera sensor captured. One of the huge trade offs is file size, a RAW image can be anywhere from 8MB up to 50MB depending on the resolution of your camera. On the other hand a compressed baked in .jpeg can be 2 to 3 MB depending on your resolution. But hey, storage is cheap these days right? 🙂 If you intend to or enjoy tweaking your images or you just want that safety net to fix something later, I highly suggest shooting in RAW. You can always make small jpegs when you’re done editing. Happy “Fixing it in Post” as they say! 😉
Here is another example, although a portrait Before and After image in challenging uncontrollable lighting conditions where RAW gave me the ability to make these edits:


2 Responses
Thomas Cass
Your above sample is horrible and a good example of how not to post process.
woolleyphotoguy
Ha! Your feedback is so thoughtful, thank you for your opinion